
Kubernetes Notes
it’s just kubernetes notes.
1. The Background
Before Kubernetes existed, running containers in production was much more manual and operationally heavy.
In the early days of container adoption, an engineer used simple commands like:
docker run app
docker run nginx
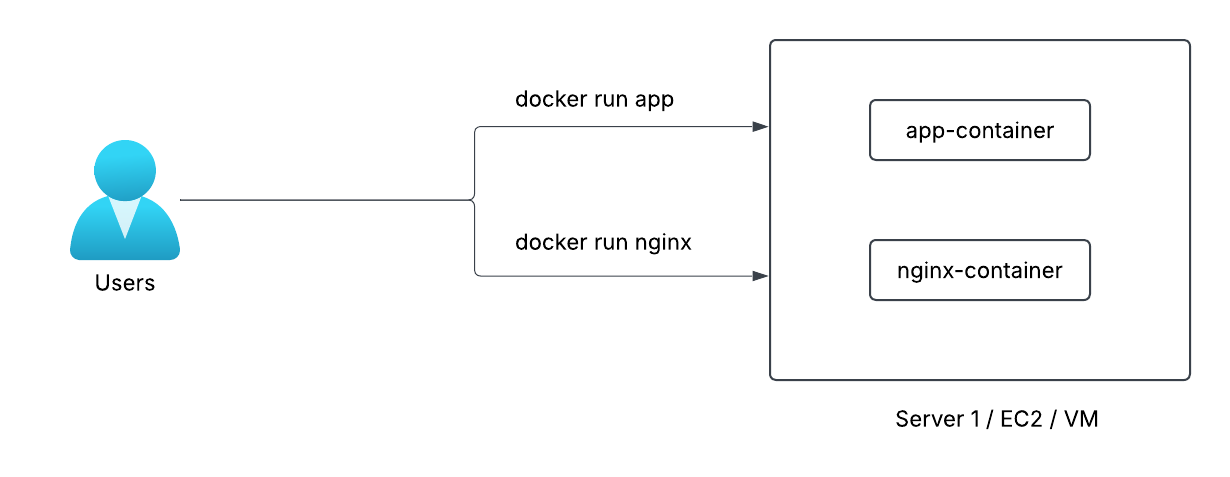
This worked well for small experiments or single-server environments. But once applications needed to run in production, there are few problems started to appear.
1.1 Manual Scaling
When traffic increased, engineers had to manually start more containers.
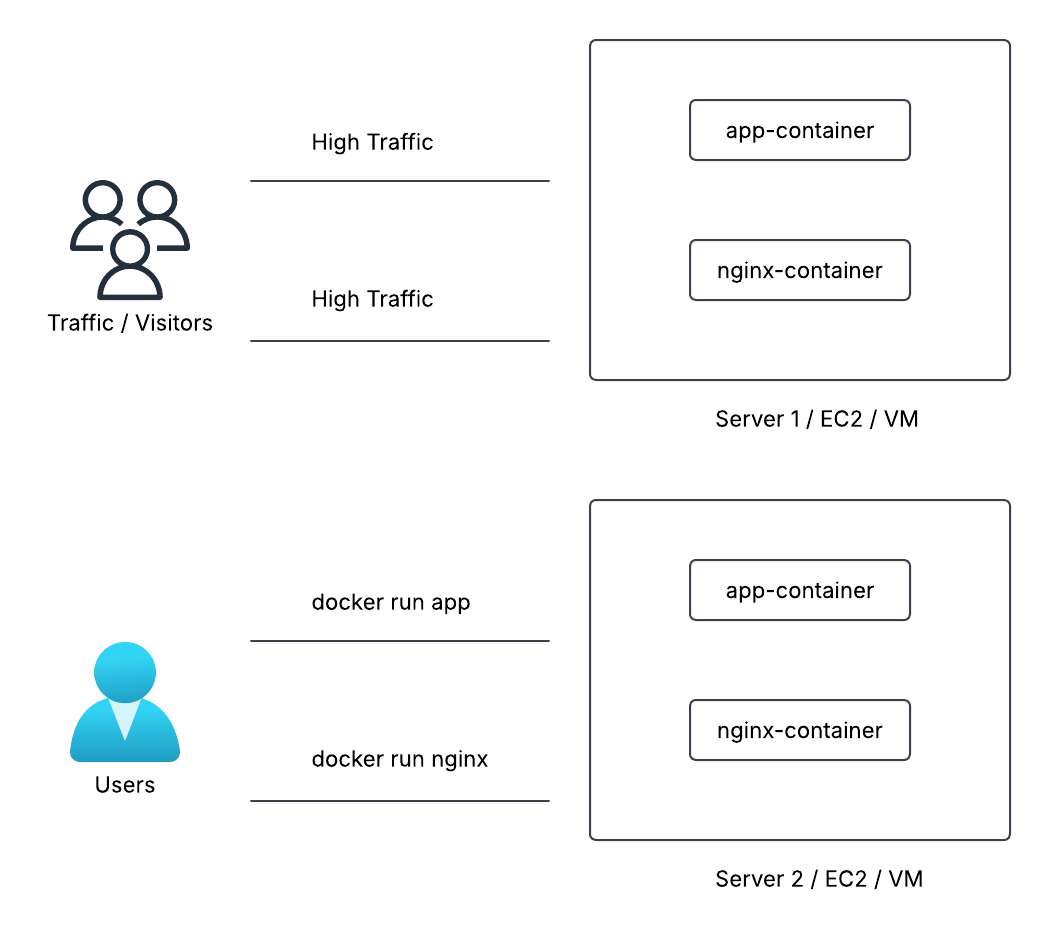
That meant:
- Finding a server with enough CPU and memory
- Running new containers manually
- Keeping track of where everything was running
There was no intelligent system deciding:
- Where the container should run
- How many replicas were needed
- When to scale up or scale down
Everything required human intervention.
1.2 No Built-in Self-Healing (Lack of Fault Tolerance)
If a container crashed due to:
- Application bugs
- Memory issues
- Node failure
It would simply stop running.

There was no automatic mechanism to:
- Detect failure
- Restart the container
- Replace it on another healthy machine
Engineers had to monitor and fix it manually.
1.3 Operational Complexity at Scale
Running 3–5 containers manually is manageable.
Running 300 containers across multiple servers? That becomes a serious operational problem.
The Engineers needed a system that could:
- Automatically schedule containers
- Handle scaling
- Restart failed workloads
- Manage networking
- Maintain desired state
2. Container Orchestration
Container orchestration automates the deployment, management, scaling, and networking of containers. Kubernetes is one of them.
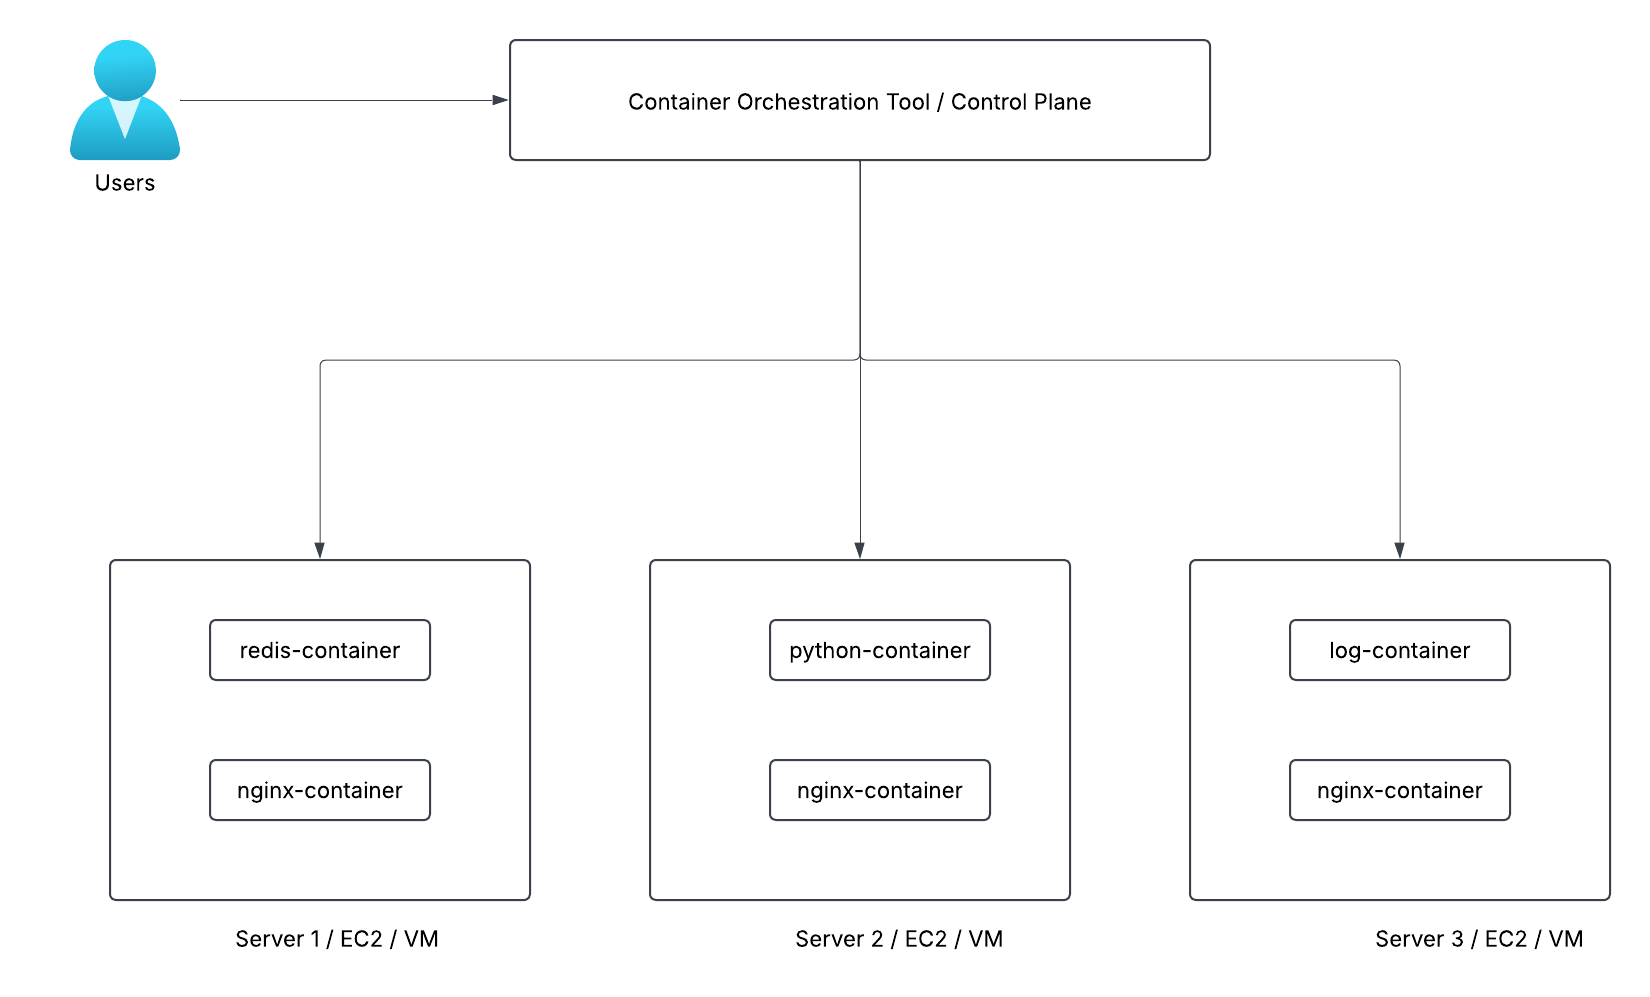
Kubernetes then:
- Finds the best nodes
- Sarts the containers
- Monitors them
- Restarts them if they fail
- Scales them when needed
In short:
Docker runs containers.
Kubernetes runs containerized systems.
2.1 Architecture of Kubernetes
A Kubernetes cluster consists of a control plane + a set of worker machines, called nodes, that run containerized applications.

2.2 Workflow
User communicates to Control Plane and provides necessary instructions to run containerized applications.
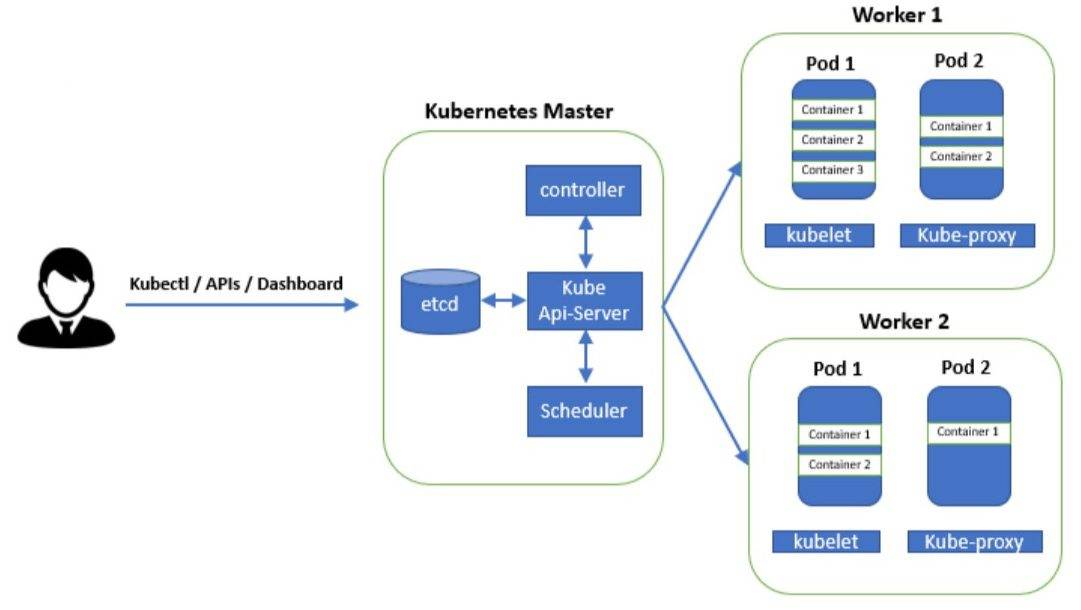
If you have instructed Kubernetes to run 1 container of Apache, Kubernetes will launch it in one of the worker nodes and will regularly monitor the state of that container to ensure it always runs.
There are three ways to connect to the cluster, through API, CLI, and GUI.
But, i prefer using CLI since it’s faster for most operation.
3. kubectl and authentication
To connect using kubectl to your cluster, you need file called kube config. You can refer to the documentation for this.
To see config file run:
# View Merged Kubeconfig Settings
kubectl config view
cat ~/.kube/config

# View only the current context (This tells you which cluster your commands are currently targeting)
kubectl config current-context

# List all available contexts (This shows all the defined clusters you can switch between)
kubectl config get-contexts

# List all defined clusters
kubectl config get-clusters
4. Kubernetes Pods
A Pod is the smallest deployable unit in Kubernetes.
Each Pod:
- Contains one or more containers
- Shares one IP address
- Can share volumes (storage)
- Runs on one Node (EC2)
There are few characteristics of a pods:
5.1 Shared Network
All containers inside a Pod:
- Share the same IP address
- Share the same port space
- Can communicate via localhost
For example, if Container A runs on port 3000, Container B can call:
http://localhost:3000
5.2 Shared Storage
Containers inside a Pod can share volumes.
Example use case:
- One container writes logs
- Another container processes logs
5.3 Ephemeral (Temporary)
Pods are not permanent.
If a Pod:
- Crashes
- Deleted
- Node fails
Kubernetes creates a new Pod (with a new IP).
That’s why never rely on:
- Pod IP
- Local container storage
5. Create Kubernetes Objects
There are two main ways to create objects in Kubernetes:
- Using kubectl run (command line)
- Using a manifest file (YAML file)
5.1 kubectl run
kubectl run is a quick way to create a Pod from the command line.
kubectl run nginx-pod --image=nginx

# Check with
kubectl get pods
What this does:
- Creates a Pod
- Pulls the nginx image
- Runs it inside the cluster
It’s fast and simple, but this approach is not good for production.
5.2 Manifest File
A manifest file is a configuration file written in YAML. Instead of typing everything in the terminal, you define your object in a file.
apiVersion: v1
kind: Pod
metadata:
  name: nginx-pod
spec:
  containers:
    - name: nginx-container
      image: nginx
      ports:
        - containerPort: 80
Apply with kubectl apply -f pod.yaml.
This approach is easy to manage and can be stored in Git.
6. Structure of Manifest File
A manifest file has three main sections:
apiVersion: Specifies the Kubernetes API version to use.kind: Specifies the type of Kubernetes object (e.g., Pod, Deployment, Service).metadata: Contains metadata about the object, such as its name and labels.spec: Contains the specification of the desired state of the object.
apiVersion: [apiVersion]
kind: [Resource Type]
metadata:
  name: [Resource Name]
spec:
  [Resource-specific Configuration]
6.1 Generating Manifest File through CLI Command
You can generate a manifest file using kubectl with the --dry-run and -o yaml flags.
kubectl run nginx-pod --image=nginx --dry-run=client -o yaml > pod.yaml
This command:
- Creates a Pod named
nginx-podwith the nginx image - Does not actually create the Pod (
--dry-run=client) - Outputs the manifest in YAML format (
-o yaml) - Saves it to a file named
pod.yaml
7. Multi-Container Pods
A Pod can contain multiple containers that work together. They share the same network, namespace and storage.
For example, you can have:
- An application container
- A logging container that processes logs from the application container
This allows us to run multiple related processes together in the same Pod.
7.1 Multi-Container Pods Configuration
Here’s an example of a Pod with two containers:
apiVersion: v1
kind: Pod
metadata:
  name: multi-container-pod
spec:
  containers:
    - name: app-container
      image: my-app-image
      ports:
        - containerPort: 80
    - name: log-processor
      image: log-processor-image
In this example:
- The
app-containerruns the main application - The
log-processorcontainer processes logs from the application container Both containers share the same network and can communicate via localhost.
7.2 Exec into Container
We can use kubectl exec to run commands inside a container in a Pod.
kubectl exec -it multi-container-pod -- /bin/bash
This is default when run kubectl exec it will connect to the first container. To connect into other containers in Pod, run below command:
kubectl exec -it multi-container-pod -c log-processor -- /bin/bash
Just add -c flag with <container-name>.
8. Labels and Selectors
Labels are key-value pairs attached to Kubernetes objects.
They are used to:
- Organize resources
- Group related objects
- Select specific objects.
Labels can be added to:
- Pods
- Nodes
- Deployments
- Services
- Any Kubernetes object
Example:
We can label a node like this:
kubectl label nodes worker-node-1 env=production
Or inside a manifest file:
metadata:
  labels:
    env: production
    tier: backend
Here:
envis the keyproductionis the value
For Selector, Selectors are used to find objects with specific labels.
For example, a Service can select Pods with:
selector:
  app: frontend
So this means:
Connect to all Pods that have label app=frontend.
Simple Example
Imagine we have 10 Pods.
Some have:
labels:
  app: frontend
Others have:
labels:
  app: backend
A selector with app=frontend will only target the frontend Pods.
9. ReplicaSet
Let’s say we have requirement to run 5 Pods based on Nginx image all the time.
Of course, first we have to run it manually. But there are some issues when we run it with manual step.
- If a pod failed, let’s say because of node failure, process crash, etc. Kubernetes will not automatically recreate it. We would have to manually detect the failure and recreate the pod.
- And if we need to scale to more or fewer pods, we would have to manually create or delete pod definition and apply the changes.
So, this problem can be solved by Replica Set.
A ReplicaSet is a Kubernetes resource that ensures a specific number of Pod replicas are always running.
In simple terms:
A ReplicaSet makes sure the number of Pods we want is always Running.
So if a Pod crashes or is deleted, the ReplicaSet will automatically create a new Pod to replace it.
9.1 Why ReplicaSet is Useful
Applications need to stay available. ReplicaSet helps by:
- Keeping the desired number of Pods running
- Automatically replacing failed Pods
- Supporting scaling (more or fewer Pods)
Example:
If we want 3 Pods running and one fails, Kubernetes will create a new Pod so the total stays 3.
Here is an example of ReplicaSets Manifest:
apiVersion: apps/v1
kind: ReplicaSet
metadata:
  name: nginx-replicaset
spec:
  replicas: 3
  selector:
    matchLabels:
      app: nginx
  template:
    metadata:
      labels:
        app: nginx
    spec:
      containers:
        - name: nginx
          image: nginx
Explanation:
replicas: 3→ Kubernetes keeps 3 Pods runningselector→ Finds Pods with labelapp: nginxtemplate→ Defines how new Pods should be created
| Pod | ReplicaSet |
|---|---|
| Runs a single instance | Manages multiple Pods |
| No self-healing | Automatically replaces failed Pods |
| Manual scaling | Automatic scaling |
9.2 Challange with ReplicaSets
ReplicaSets are useful for maintaining the number of running Pods, but they have several limitations:
9.2.1 No automatic updates
ReplicaSets only maintain the number of Running Pods.
If we update the Pod template (for example changing the image from nginx to redis), existing Pods are not updated automatically.
We would have to manually recreate the Pods.
9.2.2 No rollback mechanism
If a configuration change causes an error, ReplicaSet cannot easily revert to the previous version.
This makes updates risky in production environments.
9.2.3 Label collision problem
ReplicaSets use label selectors to manage Pods.
If a ReplicaSet selector matches Pods created by another resource, the ReplicaSet may start managing those Pods even though it didn’t create them.
This can cause unexpected behavior.
In real-world Kubernetes usage, we usually do not create ReplicaSets directly.
Instead, we create a Deployment, which automatically manages ReplicaSets for us.
10. Deployment
A Deployment is a Kubernetes resource used to manage and update applications running in Pods.
It manages ReplicaSets and provides additional features such as updates, rollbacks, and better application management.
In simple terms:
A Deployment manages ReplicaSets and provides a safe way to run and update applications in Kubernetes.
Deployments provide features that ReplicaSets lack:
- Rolling updates to update Pods gradually
- Rollback to previous versions if updates fail and it had versioning
- Better management of ReplicaSets
- Safer updates for production applications
When we create a Deployment, Kubernetes automatically creates and manages a ReplicaSet. Because it is built on top of ReplicaSets.
Deployment
   ↓
ReplicaSet
   ↓
Pods
The Deployment handles updates and scaling, while the ReplicaSet maintains the number of Pods.
Example:
apiVersion: apps/v1
kind: Deployment
metadata:
  name: nginx-deployment
spec:
  replicas: 3
  selector:
    matchLabels:
      app: nginx
  template:
    metadata:
      labels:
        app: nginx
    spec:
      containers:
        - name: nginx
          image: nginx
This Deployment will:
- Run 3 Pods
- Use the nginx container
- Automatically manage updates and scaling.
10.1 Multiple ReplicaSets in Deployment
When we update a Deployment (for example changing the container image), Kubernetes creates a new ReplicaSet for the new version.
This means a Deployment can have multiple ReplicaSets, where:
- The old ReplicaSet contains the previous version of Pods
- The new ReplicaSet contains the updated Pods
Kubernetes gradually shifts traffic from the old Pods to the new ones.
This process is called a Rolling Update.
Example flow:
Deployment
   ├── ReplicaSet (old version)
   │      └── Pods (nginx)
   └── ReplicaSet (new version)
          └── Pods (nginx:1.25)
During the update:
- New Pods are created
- Old Pods are slowly removed
- The application stays available with no downtime
10.2 Rollout History
Because Deployments keep multiple ReplicaSets, Kubernetes also keeps a history of changes.
This allows us to:
- See previous versions
- Roll back if an update fails
kubectl rollout history deployment nginx-deployment

# Example Output
REVISION  CHANGE-CAUSE
1         Initial deployment
2         Updated nginx image
10.3 Rollback to a Previous Version
If something breaks after an update, we can return to the previous version:
kubectl rollout undo deployment nginx-deployment
This command restores the previous ReplicaSet and its Pods.
11. Node Selector
A single worker nodes might not have enough resources (CPU, memory) to handle the load of all the pods.
So it is recommended to have multiple worker nodes. Also, it is not necessary for all worker nodes to have the same hardware specification.
We can check nodes by running kubectl get nodes command.
With multiple nodes, we can use Node Selector to control where Pods are scheduled.
A Node Selector is a simple way to control which Node a Pod should run on.
It works by using labels on Nodes. When a Pod has a node selector, Kubernetes will schedule the Pod only on Nodes that have the matching label.
Node Selector tells Kubernetes to run a Pod on a specific group of Nodes.
So, how it works:
- First, we label our Nodes with specific key-value pairs.
kubectl label nodes worker-node-1 env=production
kubectl label nodes worker-node-2 env=production
kubectl label nodes worker-node-3 env=staging
- Second, we add a Node Selector to our Pod definition to specify that it should only run on Nodes with the label
env=production.
apiVersion: v1
kind: Pod
metadata:
  name: nginx-pod
spec:
  nodeSelector:
    env: production
  containers:
    - name: nginx
      image: nginx
In this example, the Pod will only be scheduled on Nodes that have the label env=production.
If no Node has that label, the Pod will stay in Pending state.
Node selectors are useful when we want to run Pods on specific hardware or environments, such as:
- Nodes with SSD storage
- Nodes with GPU
- Nodes for production workloads
- Nodes in a specific region or zone
12. Node Affinity
Node Affinity is a Kubernetes feature that controls which Nodes a Pod can run on, based on Node labels.
It is similar to Node Selector, but it is more flexible.
Node Affinity allows Pods to be scheduled on Nodes that match specific label rules.
While Node Selector only supports simple matching, Node Affinity allows:
- More complex rules
- Multiple conditions
- Preferred scheduling
Because of this, Node Affinity is often used instead of Node Selector in more advanced setups.
12.1 Types of Node Affinity
There are two main types.
12.1.1 Required Node Affinity
This is a strict rule.
The Pod must run on a Node that matches the condition.
If no matching Node exists, the Pod will stay in Pending.
apiVersion: v1
kind: Pod
metadata:
  name: nginx
spec:
  affinity:
    nodeAffinity:
      requiredDuringSchedulingIgnoredDuringExecution:
        nodeSelectorTerms:
        - matchExpressions:
          - key: Size
            operator: In
            values:
            - m5.2xlarge
  containers:
  - name: nginx
    image: nginx
In this example, the Pod will only be scheduled on Nodes with the label Size = m5.2xlarge.
12.1.1 Preferred Node Affinity
This is a soft rule.
Kubernetes will try to schedule the Pod on matching Nodes, but if none exist, it will still run the Pod on other Nodes.
apiVersion: v1
kind: Pod
metadata:
  name: nginx
spec:
  affinity:
    nodeAffinity:
      preferredDuringSchedulingIgnoredDuringExecution:
      - weight: 1
        preference:
          matchExpressions:
          - key: Size
            operator: In
            values:
            - m5.2xlarge
  containers:
  - name: nginx
    image: nginx
In this example, Kubernetes will prefer to schedule the Pod on Nodes with Size = m5.2xlarge, but if none are available, it will still schedule the Pod on other Nodes.
12.2 Common Operators
In: Label value must matchNotIn: Label value must not matchExists: Label key must existDoesNotExist: Label key must not exist
13. Daemonset
A DaemonSet is a Kubernetes resource that ensures a Pod runs on every Node in the cluster.
This means Kubernetes will automatically create one Pod per Node.
If a new Node joins the cluster, the DaemonSet will automatically create a Pod on that Node as well.
A DaemonSet makes sure a specific Pod runs on all (or selected) Nodes.
How DaemonSet Works:
- Kubernetes checks all available Nodes.
- It schedules one Pod on each Node.
- If a new Node is added, a new Pod is automatically created.
- If a Node is removed, the Pod on that Node is removed as well.
Node 1 → Pod
Node 2 → Pod
Node 3 → Pod
DaemonSets are typically used for system-level services that need to run on every Node.
Examples:
- Log collection agents (collect logs from every Node)
- Monitoring agents
- Network plugins
- Security monitoring tools
These services must run on all Nodes, which makes DaemonSet the perfect resource.
Example DaemonSet Manifest:
apiVersion: apps/v1
kind: DaemonSet
metadata:
  name: log-agent
spec:
  selector:
    matchLabels:
      app: log-agent
  template:
    metadata:
      labels:
        app: log-agent
    spec:
      containers:
        - name: log-agent
          image: fluentd
          resources:
            limits:
              memory: "200Mi"
              cpu: "500m"
In this example, a Pod running the fluentd log agent will be created on every Node in the cluster.
Requests and Limits
In Kubernetes, Requests and Limits are used to control how much CPU and memory a container can use.
They help Kubernetes schedule Pods properly and prevent one container from using too many resources.
Requests define the minimum resources a container needs, while Limits define the maximum resources it can use.
Requests
A request is the amount of CPU or memory that a container needs to run.
Kubernetes uses this value to decide which Node is suitable for the Pod.
If a container requests 500Mi memory, Kubernetes will place it on a Node that has at least that much available memory.
Limits
A limit is the maximum amount of CPU or memory a container is allowed to use.
If the container tries to use more than the limit:
- CPU → it will be throttled (slowed down)
- Memory → the container may be terminated (OOMKilled)
Example of Requests and Limits:
apiVersion: v1
kind: Pod
metadata:
  name: nginx-pod
spec:
  containers:
    - name: nginx
      image: nginx
      resources:
        requests:
          memory: "128Mi"
          cpu: "250m"
        limits:
          memory: "256Mi"
          cpu: "500m"
In this example:
- The container requests 128Mi of memory and 250m of CPU.
- The container can use up to 256Mi of memory and 500m of CPU. This is the maximum.
Requests and Limits help us to:
- Prevent resource starvation
- Improve cluster stability
- Ensure fair resource usage
- Help Kubernetes schedule Pods efficiently
Priority Class
PriorityClass is a Kubernetes resource used to define the priority level of Pods.
It tells Kubernetes which Pods are more important when scheduling or when resources are limited.
PriorityClass helps Kubernetes decide which Pods should run first.
Why PriorityClass is Useful
In a cluster with limited resources, not all Pods can run at the same time.
PriorityClass helps Kubernetes decide which Pods should be scheduled first.
If the cluster does not have enough resources, Kubernetes may evict lower-priority Pods to make room for higher-priority Pods.
This process is called Pod preemption.
How PriorityClass Works
- First, we create a PriorityClass with a priority value.
- Pods reference that PriorityClass.
- Kubernetes uses the priority value to decide scheduling order.
Higher value = higher priority.
Example of PriorityClass:
apiVersion: scheduling.k8s.io/v1
kind: PriorityClass
metadata:
  name: high-priority
value: 1000
globalDefault: false
description: "This priority class is for critical applications"
In this example:
- We create a PriorityClass named
high-prioritywith a value of1000. - Pods that reference this PriorityClass will have a high priority when scheduling.
Example of a Pod referencing PriorityClass:
apiVersion: v1
kind: Pod
metadata:
  name: critical-app
spec:
  priorityClassName: high-priority
  containers:
    - name: app
      image: critical-app-image
In this example, the critical-app Pod will have a high priority when Kubernetes schedules it.
Another example scenario
Imagine the cluster is full:
- Pod A → priority 1000
- Pod B → priority 100
If resources run out, Kubernetes may stop Pod B so Pod A can run.
Overview of Service
In Kubernetes, every Pod gets its own private IP address.
Pods inside the same cluster can communicate using these private IPs.
Use Case: Front End and Back End
Let’s say we have:
- A frontend Pod
- A backend Pod
The frontend needs to call the backend.
Well, we can refer to the backend pod IPs. But, this will creates several problems:
- Pods are ephemeral (they can be deleted and recreated)
- When recreated, they get a new IP address
- If we hardcoded the IP, our app will be break
If the backend pods are running as deployment, there is problems like:
- We will have multiple backend Pods
- Each Pod has a different IP
- Hardcoding all IPs is not practical
Also, we want to:
Distribute traffic across all backend Pods (load balancing)
This is where Service comes in.
Introduction of Services
A Service provides a stable IP and DNS name to access a group of Pods.
Instead of calling Pod IPs, the frontend calls the Service.
So, how it works?
- We create a Service.
- The Service uses a selector to find matching Pods.
- Kubernetes automatically creates Endpoints (list of Pod IPs).
- Traffic is distributed across those Pods.
Endpoints are the actual Pod IP addresses behind a Service.
- Service = stable entry point
- Endpoints = real Pods
So the flow is like:
Frontend → Service → Endpoints (Backend Pods)
- Frontend calls Service
- Service forwards request to one of the backend Pods
- Load is distributed automatically
Practical Service and Endpoints
Let’s see a simple real-world example of how Service and Endpoints work together.
Step 1: Backend Deployment
First, we create backend Pods using a Deployment:
apiVersion: apps/v1
kind: Deployment
metadata:
  name: backend-deployment
spec:
  replicas: 3
  selector:
    matchLabels:
      app: backend
  template:
    metadata:
      labels:
        app: backend
    spec:
      containers:
        - name: backend
          image: nginx
          ports:
            - containerPort: 80
This creates 3 backend Pods with the label app=backend. Each pod has it’s own IP.
Step 2: Create a Service
Now, create a Service to expose these Pods:
apiVersion: v1
kind: Service
metadata:
  name: backend-service
spec:
  selector:
    app: backend
  ports:
    - port: 80
      targetPort: 80
This Service will:
- Select Pods with
app=backend - Expose port 80
Step 3: What Happens Internally
When the Service is created:
- Kubernetes looks at the selector:
app: backend
- It finds all matching Pods
- It automatically creates Endpoints
Step 4: Endpoints Example
We can check endpoints with:
kubectl get endpoints backend-service

# Example Output
NAME              ENDPOINTS
backend-service   10.1.1.2:80, 10.1.1.3:80, 10.1.1.4:80
These IP are actual backend Pods.
Step 5: Traffic Flow
Frontend Pod → backend-service → Backend Pods
- Frontend calls
backend-service - Service forwards request to one of the backend Pods
- Load is balanced across all backend Pods
So, even if:
- A Pod crashes
- A new Pod is created
- IPs change
Kubernetes will:
- Update Endpoints automatically
- Keep the Service working
Types of Services
Kubernetes provides different types of Services to expose applications based on how they should be accessed.
1. ClusterIP (Default)
ClusterIP is the default Service type.
It exposes the application only inside the Kubernetes cluster.
Pods can communicate with the Service using its DNS name or Cluster IP, but users outside the cluster cannot access it directly.
Use Cases
- Frontend communicating with backend APIs
- Communication between microservices
- Internal databases
- Internal caching services such as Redis
Example
Frontend Pod → backend-service → Backend Pods
2. NodePort
NodePort exposes the Service on a specific port of every Node in the cluster.
The application can be accessed using:
http://<NodeIP>:<NodePort>
Kubernetes forwards traffic from the NodePort to the Service and then to the Pods.
Use Cases:
- Development and testing environments
- Learning Kubernetes concepts
- Small on-premise deployments
- Situations where a cloud load balancer is not available
Example:
User → Node IP:30080 → Service → Pods
3. LoadBalancer
LoadBalancer exposes the Service through an external load balancer provided by the cloud platform such as AWS, Google Cloud, and Azure.
When the Service is created, Kubernetes requests a public IP from the cloud provider.
Use Cases:
- Public websites
- Public APIs
- Production applications
- Applications that need internet access
Example
Internet → LoadBalancer → Service → Pods
4. ExternalName
ExternalName maps a Kubernetes Service to an external DNS name.
Instead of forwarding traffic to Pods, Kubernetes returns the external DNS name.
Use Cases:
- Connecting to external databases
- Accessing third-party APIs
- Migrating applications without changing code
Example
Application → external-service → External DNS (e.g., api.example.com)
Ingress
As applications grow, a cluster may contain many Services such as:
- Frontend Service
- Backend API Service
- Authentication Service
- Admin Service
If each Service is exposed using a LoadBalancer, we’ll end up with multiple external IP addresses, which can be expensive and difficult to manage.
This is where Ingress comes in.
Ingress provides a single entry point to route external traffic to different Services inside the cluster.
Ingress Resource
An Ingress is a Kubernetes resource that defines routing rules for incoming HTTP and HTTPS traffic.
It tells Kubernetes:
- Which domain should be used
- Which path should be matched
- Which Service should receive the request
Example:
app.example.com      → frontend-service
api.example.com      → backend-service
admin.example.com    → admin-service

# Using path
example.com/         → frontend-service
example.com/api      → backend-service
example.com/admin    → admin-service
Example of Ingress Resource:
apiVersion: networking.k8s.io/v1
kind: Ingress
metadata:
  name: my-ingress
spec:
  rules:
    - host: example.com
      http:
        paths:
          - path: /api
            pathType: Prefix
            backend:
              service:
                name: backend-service
                port:
                  number: 80
This rule means example.com/api → backend-service.
Overview of Helm
As Kubernetes applications become more complex, managing YAML files can become difficult.
A typical application may require multiple resources:
- Deployment
- Service
- ConfigMap
- Secret
- Ingress
- PersistentVolumeClaim
Managing all these YAML files manually can be time-consuming and error-prone.
This is where Helm helps.
Helm is a package manager for Kubernetes.
Namespace
A Namespace is a way to logically divide and organize resources within a Kubernetes cluster.
Why Do We Need Namespaces?
Let’s say a cluster used by multiple teams:
- Development team
- Testing team
- Production team
Without namespaces, all resources would exist together, making them difficult to manage and potentially causing naming conflicts.
Namespaces solve this problem.
Example:
Instead of one shared space:
Cluster
├── frontend-deployment
├── backend-deployment
└── database
We can create separate resources:
Cluster
├── dev
│   ├── frontend-deployment
│   └── backend-deployment
│
├── test
│   ├── frontend-deployment
│   └── backend-deployment
│
└── prod
    ├── frontend-deployment
    └── backend-deployment
Each team can have its own namespace, allowing them to manage their resources independently.
Service Account
Kubernetes Cluster have two categories of account:
- User Accounts (For Humans)
- Service Accounts (For Application)
Service Account is an identity used by applications and Pods to interact with the Kubernetes API.
Sometimes an application needs to interact with Kubernetes.
For example, an application may need to:
- Read Pods
- Create Jobs
- Watch Deployments
- Access ConfigMaps
- Query cluster information
To do this securely, the Pod needs an identity. That’s where a Service Account comes in.
When a Pod uses a Service Account:
- Kubernetes provides credentials to the Pod.
- The Pod uses those credentials to authenticate.
- Kubernetes checks what permissions the Service Account has.
- The action is allowed or denied.
FLow:
Pod
  ↓
Service Account
  ↓
Kubernetes API
  ↓
Permission Check (RBAC)
Default Service Account
Every Namespace automatically has a Service Account called default.
If we don’t specify a Service Account, our Pod will use the default one.
To view service account:
kubectl get serviceaccounts